Device Setup
Network Setup -
Once you have the Qualcomm® Robotics RB1 and/or Qualcomm® Robotics RB2 listed under adb devices on Host PC, Follow the steps below to setup the network.
$ adb root
$ adb disable-verity
$ adb reboot && adb wait-for-device && adb root

$ adb shell mount –o remount, rw / && adb shell
- Using a text editor in the host PC, create a wpa_supplicant.conf file and enter the following – make sure you input your Wi-Fi network and your Wi-Fi password where highlighted below:
network={
 ssid="<your Wi-Fi network >"
 key_mgmt=WPA-PSK
 pairwise=TKIP CCMP
 group=TKIP CCMP
 psk="<your Wi-Fi password>"
} - Push the file into the development kit
c:\adb push wpa_supplicant.conf /etc/wlan/
c:\adb shell sync - Reboot the device to redo the Wi-Fi provisioning.
c:\>adb reboot && adb wait-for-device && adb root && adb shell mount -o remount,rw / && adb shell - After a few moments, check if wlan0 is up and connected to network.
In Qualcomm Robotics RB1 and/or Qualcomm Robotics RB2 shell, use ifconfig to see the wlan0 details
# ifconfig

...
wlan0 Link encap:Ethernet HWaddr 00:0A:F5:A9:66:46
 inet addr:192.168.86.153 Bcast:192.168.86.255 Mask:255.255.255.0
 inet6 addr: fe80::20a:f5ff:fea9:6646/64 Scope:Link
 UP BROADCAST RUNNING MULTICAST MTU:1500 Metric:1
 RX packets:1643697 errors:0 dropped:0 overruns:0 frame:0
 TX packets:76012 errors:0 dropped:0 overruns:0 carrier:0
 collisions:0 txqueuelen:3000
 RX bytes:2144208637 (1.9 GiB) TX bytes:22562296 (21.5 MiB)
You can also use dhcpcd wlan0 to see if an IP address is assigned to the device.
The network should now be available. You should be able to ping the internet.
# ping www.qualcomm.com

PING e1479.x.akamaiedge.net (23.36.57.162): 56 data bytes
64 bytes from 23.36.57.162: icmp_seq=0 ttl=56 time=27.353 ms
64 bytes from 23.36.57.162: icmp_seq=1 ttl=56 time=68.265 ms
64 bytes from 23.36.57.162: icmp_seq=2 ttl=56 time=65.011 ms
Setup HDMI
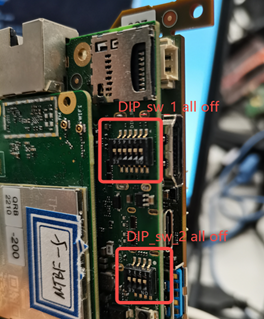
Double check the if following switches on IO Board are OFF( They should be set to OFF by default)
- DIP_SW_1 - PIN 4
- DIP_SW_2 - PIN 1 2 3 4
Connect a HDMI cable from the HDMI port on the Qualcomm Robotics RB1/RB2 development kit and a monitor
The Weston desktop will be displayed on the monitor at this point.
Connect peripherals - Keyboard and mouse to the Qualcomm Robotics RB1/RB2 development kit
Make sure to set the DIP switches as listed here to enable Type A ports
- DIP_SW_1 - PIN 6 - OFF (Disables Type C and enables Type A ports on the development kit)
- DIP_SW_3 - PIN 3 - ON
** If your HDMI output is flickering at this point, please connect a serial cable between your development kit and the host PC
Note : Either Type C or Type A ports can be enabled at a given time, but not both at once
Qualcomm branded products are products of Qualcomm Technologies, Inc. and/or its subsidiaries.