Getting started with Qualcomm Innovators Development Kit

1. Introduction

The Qualcomm® Innovators Development Kit is a single-board computer (SBC) built on the Snapdragon® 8 Gen 2 mobile platform. The development kit is an expandable, feature-rich starting point for integrating existing components and creating new applications and mobile devices.

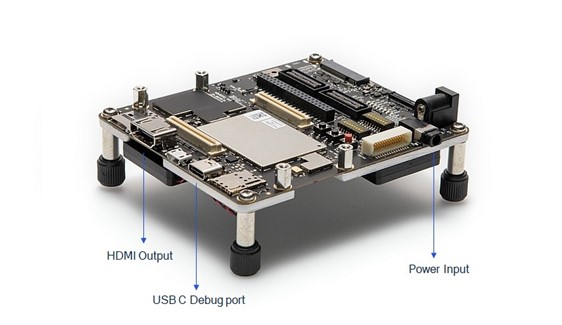
Figure-1 - Qualcomm Innovators Development Kit, Main Board
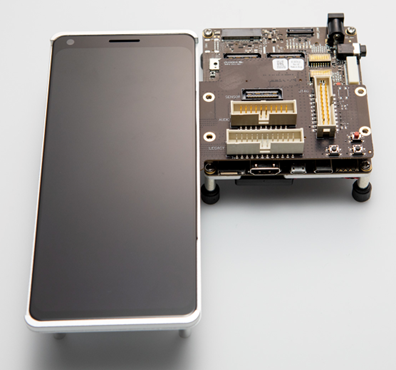
Figure-2 - Qualcomm Innovators Development Kit, Main Board with Display Card

The kit offers access to innovative and intelligent on-device AI, support for 3D cameras, desktop-quality graphics, gigabit-per-second download speeds and up to 4K UHD output. The kit primarily contains three parts, above image shows all of them connected.

  1. Qualcomm Innovators Development Kit - Main Board
  2. Display extension board
  3. Camera/Sensor subsystem board
NoPartIncluded/Optional
1Main Board with SM8550P ProcessorIncluded
212V DC Power adaptorIncluded
3USB-c CableIncluded
4Display cardOptional
5Camera CardOptional
6Sensor CardOptional
7Speakers x 2Optional
8BatteryOptional

For more details of Snapdragon 8 Gen 2 Mobile Platform, please refer to product page.

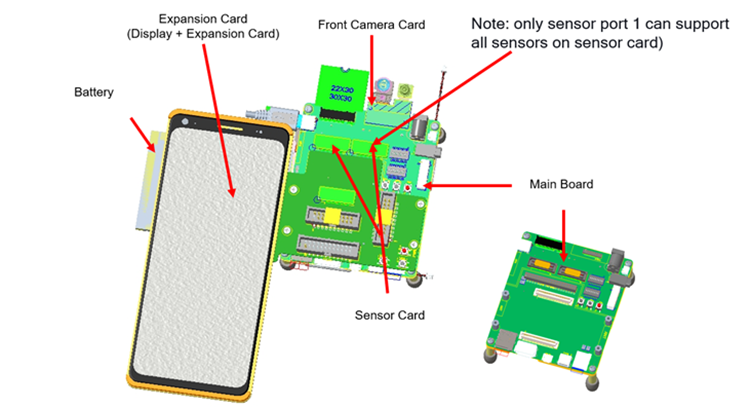
Figure-3 - Components on front side of Development Kit
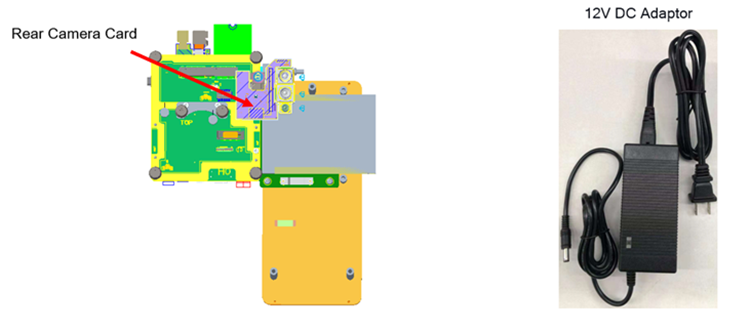
Figure-4 - Components on back side of Development Kit

2. Setting up the development kit

The development kit comes with pre-loaded Android binaries. You will see the Android home screen as soon as the device is turned on.

Figure-5 – Android Home screen sample

Below video explains the basic components, how to connect them together and procedure to boot the device with an external display.

2.1. Build demos from source

2.1.1. Pre-requisites

You should finish setting up the following to build the demos

  1. ADB setup: https://developer.android.com/studio/command-line/adb
  2. Download and install Android Studio: https://developer.android.com/studio
  3. Download and setup Android NDK: https://developer.android.com/ndk (Version: r17c)
  4. Download and install Android SDK (SDK version 23 and build tools version 23.0.2)
  5. The SDK requires either Caffe, Caffe2, ONNX, PyTorch, TensorFlow or TFLite.
  6. Please ensure Android SDK, and NDK environmental variables are properly set.

2.1.2. Compile and Run demo from source code

Necessary resources to run the demo:

  • Qualcomm® Neural Processing SDK release binary.
  • Model binaries are not included with source code. Steps to generate model binary are provided with individual sample app documentation.

Once you have setup the pre-requisites for the Android application development environment, you can directly load the demo project in Android Studio, compile the project into an APK, and run the demo.

  1. Launch Android Studio
  2. Load existing demo project into Android Studio workspace with: File -> Open Project

    Figure-6 - Select existing project in Android Studio

  3. Build the APK:
    From the Android Studio menu, select Build -> Build APK
  4. Output APK gets generated at: /app/build/outputs/apk/debug
  5. Install the APK on development kit using “adb install
  6. Run the application from Android UI
  7. For an overview of how the demos should look, please refer to the Individual readme pages on GitHub. A demo GIF is given for each demo, for reference.

2.1.3. Re-build sample application with newer version of Qualcomm Neural Processing SDK

Current APK's are built with SDK release version 2.5.x
To re-build, and run APK with newer SDK release – user should follow two steps:

  1. Verify if the DLC model works fine with newer SDK version. If not, user should re-convert the model binary to DLC using the newer SDK
    1. Steps to convert model to DLC were given in respective documentation for each demo (TODO: add link, add 1 model cmds as examples)
  2. Update SDK release AAR binary file in APK source path.
  3. Please note: for an application to work properly – we should use a single version of SDK, and:
    1. Copy SDK AAR from the said release to application source path
    2. Use this SDK version to convert model to DLC
  4. If the DLC was converted with a different SDK version (other than the SDK AAR binary) – results are unpredictable.

3. HDMI display output, and Emergency build loading

3.1. HDMI Display output

The development kit can display to an external display connected to HDMI (if a display card is not available).

  1. Insert the HDMI cable.
  2. Ensure that S5702 switch7 and 8 are turned ON before powering on device.
  3. The default channel is the display channel.


    Figure-7 - HDMI display output

Note: the development kit will be shipped with necessary documentation to explain the pin configuration, and other hardware details, necessary for setup.


Snapdragon, Qualcomm Neural Processing SDK, and Qualcomm Innovators Development Kit are products of Qualcomm Technologies, Inc. and/or its subsidiaries.