Camera features of TurboX C610
Exploring the camera features of the TurboX C610 using gst-pipeline-app (qtiqmmfsrc)
gst-pipeline-app is a helper tool from Qualcomm Technologies, Inc. (QTI) that exposes the same capabilities as the GStreamer gst-launch-1.0 tool. Use it to set runtime properties for any GStreamer element in the pipeline that allows a change in property while in the PLAYING state.
When a pipeline is running, gst-pipeline-app lists all elements in the pipeline. For example, the following command returns a dynamic parameter update:
/# gst-pipeline-app -e qtiqmmfsrc ! video/x-raw,format=NV12,width=1920,height=1080,framerate=30/1,camera=0 ! omxh264enc ! h264parse !mp4mux ! queue ! filesink location=v1.mp4As shown below, all elements are listed by pipeline plugin name. If the element name is specified, then the element appears with that name; otherwise, the element is displayed with the default name.
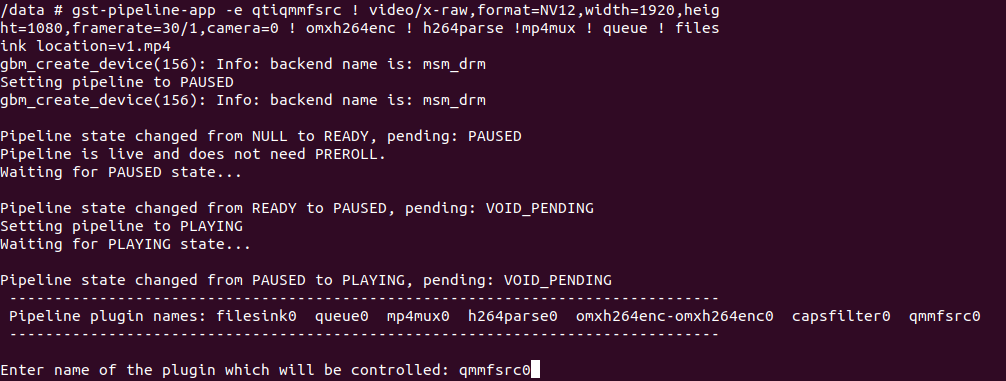
To modify a property of an element, enter the name of the element at the prompt; in the screenshot above, that plugin is qmmfsrc0. As shown below, gst-pipeline-app returns all the properties of qmmfsrc0 that can be updated, with their description.
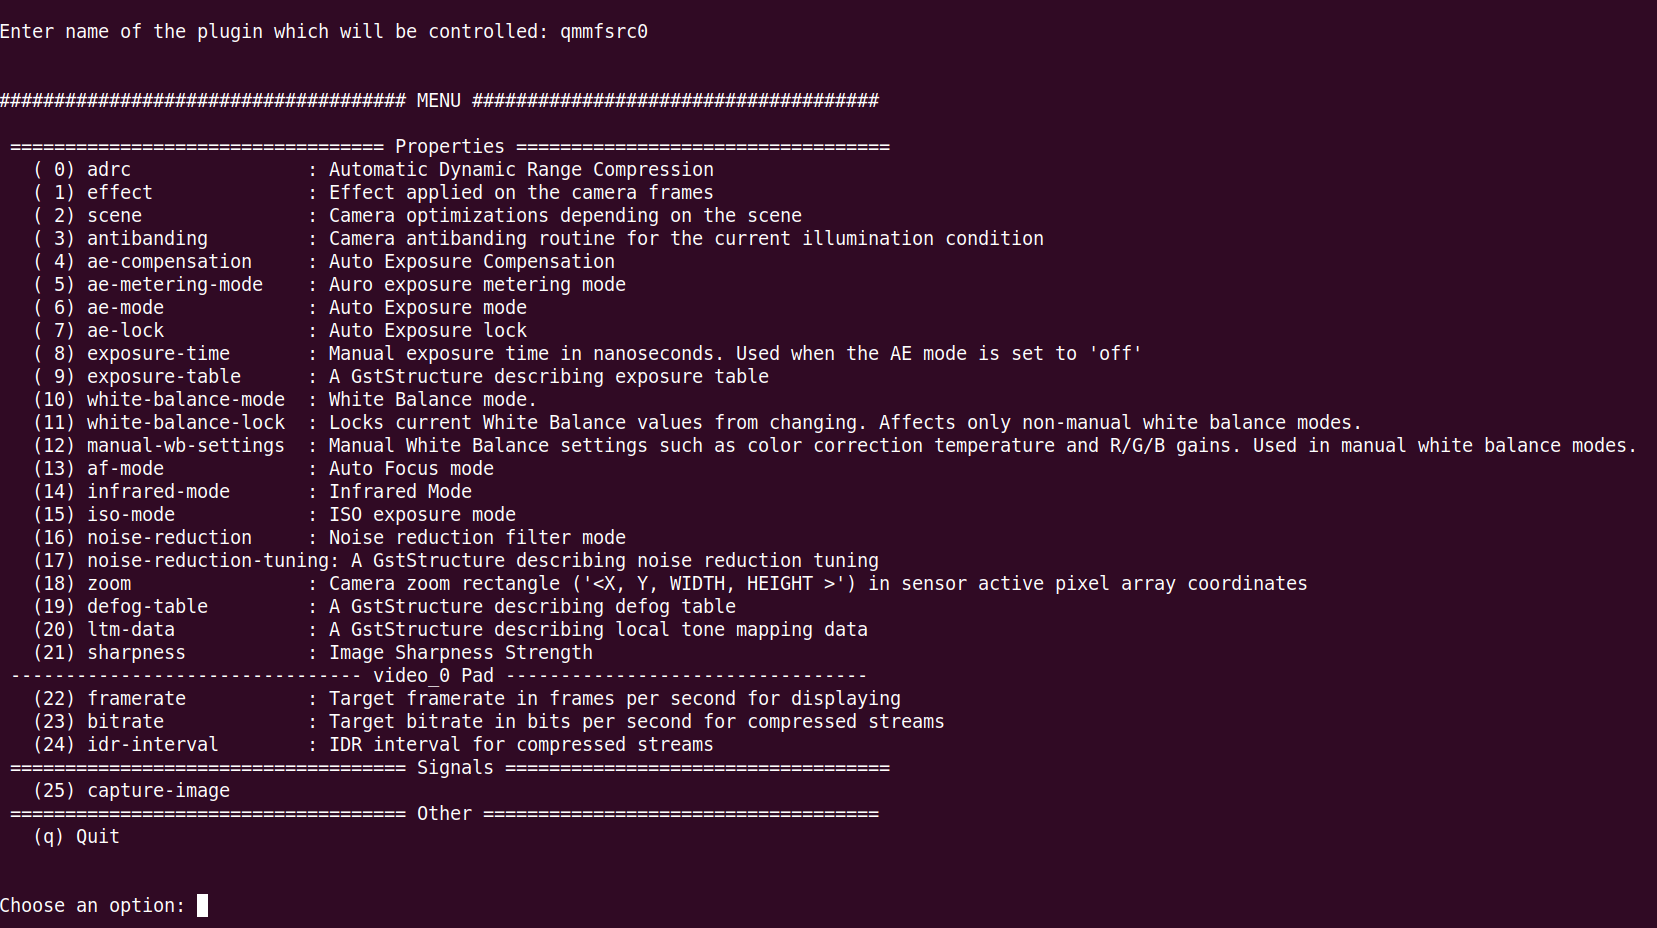
Element properties
Following are descriptions of the properties of qmmfsrc0, including how to choose the property and set the behavior of the plugin.
- infrared-mode
- effect
- antibanding
- awb-mode
- af-mode
- bitrate
- iso-mod
- adrc
- noise-reduction
After you set each property, gst-pipeline-app prompts you to set another property.
We can also configure the properties of the qtiqmmfsrc element using the gst-launch-1.0 tool. Examples of corresponding pipelines are given at end of each property; they need to be executed separately.
infrared-mode
Infrared (IR) is invisible, electromagnetic radiation with longer wavelengths than those of visible light, extending from the nominal red edge of the visible spectrum. Image sensors are capable of greater spectral range than human eyes. Therefore, to imitate human eyes, every camera has a filter that removes IR spectrum (light) above 750 nm.
In gst-pipeline-app, enter option 14 to configure an infrared mode and select the value for the desired behavior of the plugin:
0: off - The infrared LED is disabled.
1: on - The infrared LED is active until canceled.
2: auto - The infrared LED is turned OFF or ON depending on the conditions.
Here is an example of setting infrared-mode using gst-launch-1.0 tool:
/# gst-launch-1.0 -e qtiqmmfsrc name=qmmf infrared-mode=1 ! video/x-h264,format=NV12,width=1920,height=1080,framerate=30/1 ! h264parse ! mp4mux ! queue ! filesink location=video.mp4effect
You can apply a number of effects to the camera frames. In gst-pipeline-app, enter option 1 to select the effect property, then enter the number of the desired effect:
0: off - Color effect will not be applied.
1: mono - A monocolor effect where the image is mapped into a single color.
2: negative - A photo-negative effect where the image's colors are inverted.
3: solarize - A solarisation effect (Sabattier effect) where the image is wholly or partially reversed in tone.
4: sepia - A sepia effect where the image is mapped into warm gray, red, and brown tones.
5: posterize - A posterization effect where the image uses discrete regions of tone rather than a continuous gradient of tones.
6: whiteboard - A whiteboard effect where the image is typically displayed as regions of white, with black or grey details.
7: blackboard - A blackboard effect where the image is typically displayed as regions of black, with white or grey details.
8: aqua - An aqua effect where a blue hue is added to the image.
Default value is 0, which applies no effect to the camera frames.
Here is an example of setting effect using gst-launch-1.0 tool:
/# gst-launch-1.0 -e qtiqmmfsrc name=qmmf effect=2 ! video/x-h264,format=NV12,width=1920,height=1080,framerate=30/1 ! h264parse ! mp4mux ! queue ! filesink location=video.mp4antibanding
Use this property to avoid formation of bands when shooting video under an electrical light source. In gst-pipeline-app, enter option 3 to select antibanding, then enter the number of the desired behavior:
0: off - Camera device will not adjust exposure duration to avoid banding problems.
1: 50hz - Camera device will adjust exposure duration to avoid banding problems with 50Hz illumination sources.
2: 60hz - Camera device will adjust exposure duration to avoid banding problems with 60Hz illumination sources.
3: auto - Camera device will automatically adapt its antibanding routine to the current illumination condition.
Default value is 3.
Here is an example of setting antibanding using gst-launch-1.0 tool:
/# gst-launch-1.0 -e qtiqmmfsrc name=qmmf antibanding=2 ! video/x-h264, format=NV12, width=1920,height=1080,framerate=30/1 ! h264parse ! mp4mux ! queue ! filesink location=video.mp4awb-mode
White balance is the process of removing unrealistic color casts that make objects appear white. Camera white balance takes into consideration the color temperature of a light source; i.e., the warmth or coolness of white light. In gst-pipeline-app, enter option 10 to select awb-mode, then enter the number of the desired behavior:
0: off - Camera device auto-white balance routine is disabled.
1: auto - Camera device auto-white balance routine is active.
2: shade - Camera device uses shade light as the assumed scene illumination for white balance.
3: incandescent - Camera device uses incandescent light as the assumed scene illumination for white balance.
4: fluorescent - Camera device uses fluorescent light as the assumed scene illumination for white balance.
5: warm-fluorescent - Camera device uses warm fluorescent light as the assumed scene illumination for white balance.
6: daylight - Camera device uses daylight light as the assumed scene illumination for white balance.
7: cloudy-daylight - Camera device uses cloudy daylight light as the assumed scene illumination for white balance.
8: twilight - Camera device uses twilight light as the assumed scene illumination for white balance.
Default value is 1.
Here is an example of setting awb-mode using gst-launch-1.0 tool:
#/ gst-launch-1.0 -e qtiqmmfsrc name=qmmf awb-mode=4 ! video/x-h264,format=NV12,width=1920,height=1080,framerate=30/1 ! h264parse ! mp4mux ! queue ! filesink location=video.mp4af-mode
In auto-focus mode, the camera detects and focuses on a particular object. In gst-pipeline-app, enter option 13 to select af-mode, then enter the number of the desired behavior:
0: off - Auto-focus routine is disabled.
1: auto - Auto-focus routine is active.
2: macro - The auto-focus algorithm is optimized for focusing on objects very close to the camera.
3: continuous - The auto-focus algorithm modifies the lens position continually to attempt to provide a constantly-in-focus image stream.
4: edof - Camera device will produce images with an extended depth of field automatically. Special focusing is not necessary before taking a picture.
Default value is 1.
Here is an example of setting af-mode using gst-launch-1.0 tool:
#/ gst-launch-1.0 -e qtiqmmfsrc name=qmmf af-mode=2 ! video/x-h264,format=NV12,width=1920,height=1080,framerate=30/1 ! h264parse ! mp4mux ! queue ! filesink location=video.mp4bitrate
Bitrate is measured in bits per second for compressed streams, in the range from 0 to 4294967295. In gst-pipeline-app, enter option 23 to select bitrate, then enter a value that suits your application.
The default value is 6000000.
iso-mode
ISO refers to the sensitivity or light-gathering ability of film. If the ISO is high, the ability to capture images in low light is greater. The ISO setting brightens or darkens a photo. In gst-pipeline-app, enter option 15 to select ISO mode, then enter the number of the desired behavior:
0: auto - ISO exposure mode will be chosen depending on the scene.
1: deblur - ISO exposure sensitivity set to prioritize motion deblur.
2: 100 - The ISO exposure sensitivity set to prioritize level to 100.
3: 200 - The ISO exposure sensitivity set to prioritize level to 200.
4: 400 - The ISO exposure sensitivity set to prioritize level to 400.
5: 800 - The ISO exposure sensitivity set to prioritize level to 800.
6: 1600 - The ISO exposure sensitivity set to prioritize level to 1600.
7: 3200 - The ISO exposure sensitivity set to prioritize level to 3200.
Default value is 0.
Here is an example of setting iso-mode using gst-launch-1.0 tool:
#/ gst-launch-1.0 -e qtiqmmfsrc name=qmmf iso-mode=7 ! video/x-h264,format=NV12,width=1920,height=1080,framerate=30/1 ! h264parse ! mp4mux ! queue ! filesink location=video.mp4adrc
Whereas most display devices have low dynamic range, digital video cameras have high dynamic range. For digital images to look accurate and realistic on a display, it is best to apply a high dynamic range (HDR) compression technique to the captured images. In gst-pipeline-app, enter option 0 to select adrc, then enter 1 to enable or 0 to disable it.
Here is an example of setting adrc using gst-launch-1.0 tool:
#/ gst-launch-1.0 -e qtiqmmfsrc name=qmmf adrc=1 ! video/x-h264,format=NV12,width=1920,height=1080,framerate=30/1 ! h264parse ! mp4mux ! queue ! filesink location=video.mp4noise-reduction
Noise reduction removes noise from a signal. By distorting the signal to some degree, it is possible to remove noise from images or audio. In gst-pipeline-app, enter option 16 to select noise reduction, then enter the number of the desired behavior:
0: off - No noise reduction filter is applied.
1: fast - TNR (Temporal Noise Reduction) Fast Mode.
2: 100 - TNR (Temporal Noise Reduction) High Quality Mode.
Default value is 0.
Here is an example of setting noise-reduction using gst-launch-1.0 tool:
#/ gst-launch-1.0 -e qtiqmmfsrc name=qmmf noise-reduction=1 ! video/x-h264,format=NV12,width=1920,height=1080,framerate=30/1 ! h264parse ! mp4mux ! queue ! filesink location=video.mp4For more information on using gst-pipeline-app (qtiqmmfsrc):
- GStreamer video plugin
- QCS610/QCS410 Linux Platform Development Kit Quick Start Guide (login required)
- QCS610/QCS410 Linux Platform Development Kit Software Reference Manual (login required)
Qualcomm QCS610 is a product of Qualcomm Technologies, Inc. and/or its subsidiaries.