How to Flash the DragonBoard 410c
This document contains instructions for re-flashing DragonBoard™ 410c development board with the Linaro build of Debian Linux. You can also view a short video tutorial which will show you the steps you can take to reflash the board utilizing the SD card method.
Each MLH hardware lab contains the following tools to help you with this process:
- DragonBoard 410c with power supply
- Prepared SD Card with Debian Operating System
- LinkSprite 7" Touchscreen Monitor with full size HDMI cable
- MicroSD Card Adapter
- USB Keyboard
Flashing the DragonBoard 410c from SD Card
These instructions will walk you through installing the Debian operating system onto the DragonBoard 410c.
- Hardware Required
Make sure you are equipped with the following hardware:
- DragonBoard 410c with power supply
- Prepared SD Card with Debian Operating System
- LinkSprite 7" Touchscreen Monitor with full size HDMI cable
You will not need the Sensors Mezzanine, but it is referenced several times in this document. If you don’t have a Sensor Mezzanine, disregard those sections.
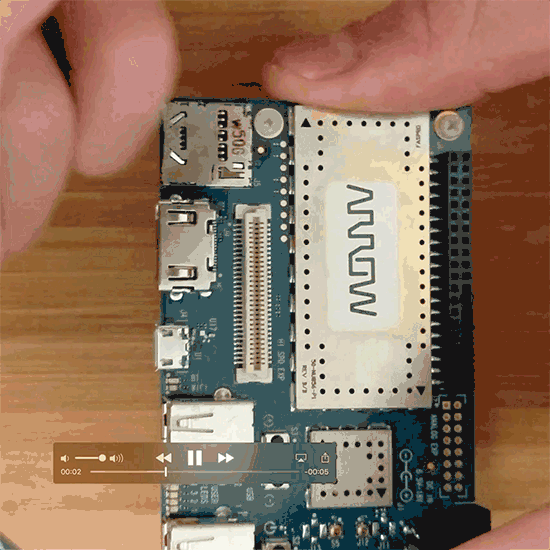
DragonBoard 410c
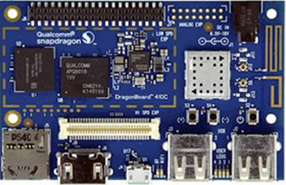
This is the device you’ll be using for the re-flashing process.
Sensor Mezzanine
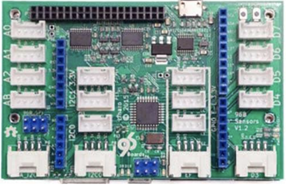
Disconnect this expansion board from the DragonBoard & set it aside.
Prepared MicroSD Card
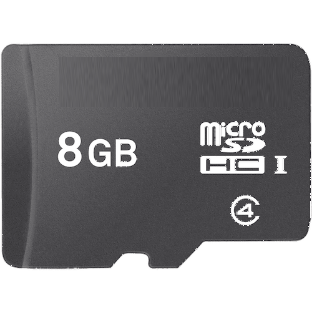
A MicroSD Card with the Debian Operating System image on it.
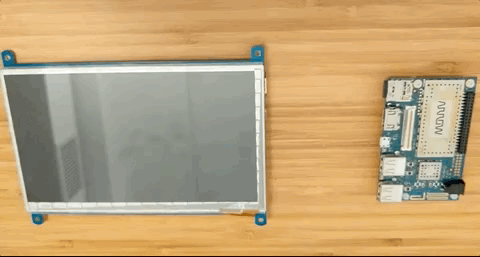
LinkSprite 7" Touchscreen Monitor
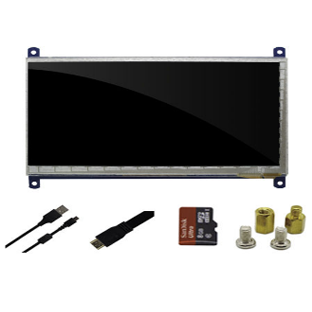
A touch screen, USB-powered monitor that connects with HDMI & micro-usb.
- Separate the DragonBoard 410c from the Sensors Mezzanine
Separate the DragonBoard 410c and the Sensors Mezzanine before attempting to re-flash the device.
- If they are attached, this process will not work.
- Insert the MicroSD Card into the DragonBoard 410c’s reader
Insert the prepared MicroSD Card into your DragonBoard 410c’s reader slot. If you don’t have a prepared card, create one using the instruction in the “Creating the re-flashing MicroSD Card” section.
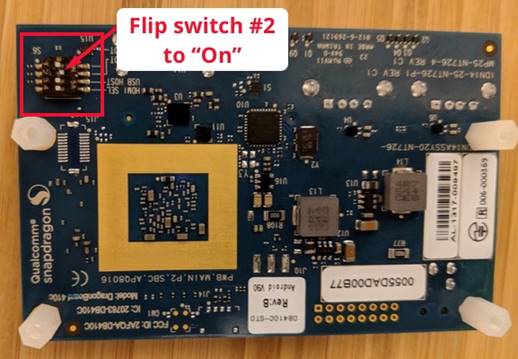
- Enable booting from MicroSD on the DragonBoard 410c
On the bottom corner of your DragonBoard 410c, there is a series of four switches labeled “S6”. Switch #2 enables booting from the SD reader, so you will need to switch this to the “on” position before proceeding. Use a paperclip or pen to flip the switch as shown.
- Connect the monitor to the DragonBoard 410c
Connect the DragonBoard 410c to the provided monitor by plugging the HDMI cable into the HDMI port and the micro-usb cable into one of the DragonBoard 410c’s USB slots.
- Connect the DragonBoard 410c to power
Next, connect the DragonBoard 410c to a power sourcing using the device’s power cable. When you connect the device, it should boot to the following screen:
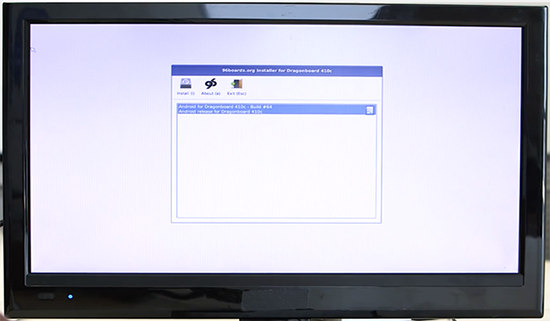
After waiting a few seconds (up to 60 seconds), if the device does not boot to this screen, try unplugging it, waiting 10 seconds, and then plugging it back in. It’s also a good idea to confirm that the S6 switch is in the correct position (see step #4). If neither of these troubleshooting steps works, you may need to create a new MicroSD Card by following the steps in the “Creating the re-flashing MicroSD Card” section.
- Click “install” in the menu
The monitor provided is touch screen, so you can use your finger to click the install button on the top left of the navigation bar. This process will take about 7 - 10 minutes to complete.
- Remove the MicroSD Card and power cycle the device
Remove the MicroSD Card from the reader. To confirm the install process worked, unplug the device, wait 10 seconds, and plug it back in. After about 60 seconds, it should boot to the Debian Linux desktop.
Creating the re-flashing MicroSD Card
This section will walk you through setting up a brand new MicroSD Card for re-flashing. The card you received with the MLH Hardware Lab comes with the operating system image on it already.
- Hardware Required
Make sure you are equipped with the following hardware:
- Host machine (Linux, Mac OS X, or Windows)
- MicroSD card with 4GB or more of storage
- MicroSD Card Adapter
- Download the Latest Debian Linux Release
The DragonBoard 410c can run a variety of operating systems. By default, we set up the boards with the Linaro build of Debian Linux. You can download the latest version of the operating system here.
Note the location of this download as you will need it in the next step.
- Locate and unzip the downloaded Linux release archive
Locate the file you downloaded in the previous step. This file is a zip archive containing an installation image of the Linaro build of Debian Linux. Unzip the archive by following the instructions corresponding to your host computer’s operating system:
- Mac / Linux (GUI) - Use the Finder / Filesystem explorer app to locate the file and then double click to automatically unzip the file.
- Mac / Linux (Command Line) - Navigate
`cd PATH_TO_DIRECTORY` to the folder containing the downloaded zip archive. Run the unzip command on the .zip file`unzip DragonBoard410c_sdcard_install_debian-*.zip`. If your machine does not have the unzip command, you may need to install it use apt-get or your operating system’s package manager. - Windows (GUI) - Right click on the file r, select “Extract All”, and then follow the instructions.
- Insert the MicroSD Card into the host machine & backup any files
Next, insert the MicroSD Card into your host machine. You will likely need to use the MicroSD Card Adapter.
Important Note: Make sure the MicroSD Card is backed up before proceeding. All data on the card will be lost during the setup process.
- Find the MicroSD Card device name
When you insert a MicroSD Card or USB Flash Drive into your host machine, it is automatically assigned a device name. You’ll need to know this device name in the next step. Follow the instructions corresponding to your host machine’s operating system to locate this device name:
Windows
- Open the file system explore application. On the sidebar, you’ll see a new drive with a name like “External Drive (X:/)”.
- If you’re not confident this is the correct device, remove the MicroSD card and confirm the device is not present. When it’s inserted the device should return to the list.
Mac
- Open the terminal application and enter the following command:
$ diskutil list - One of the listed devices should correspond to the MicroSD card. The device name should follow the format of /dev/XXX.
- If you’re not confident this is the correct device, remove the MicroSD card and run the command again. The device should not appear in the new list.
Linux
- Open the terminal application and enter the following command:
$ lsblk - One of the listed devices should correspond to the MicroSD card. The device name should follow the format of /dev/XXX.
- If you’re not confident this is the correct device, remove the MicroSD card and run the command again. The device should not appear in the new list.
- Install Image onto the MicroSD Card
To install the image on the MicroSD Card, follow the instructions for your host machine’s operating system below:
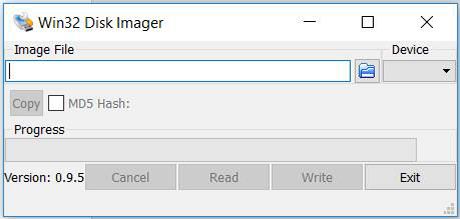
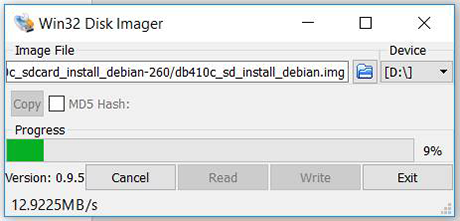
- Download the Win32DiskImager tool. You can use this direct download link or download it directly from their website here.
- Open the Win32DiskImager tool.
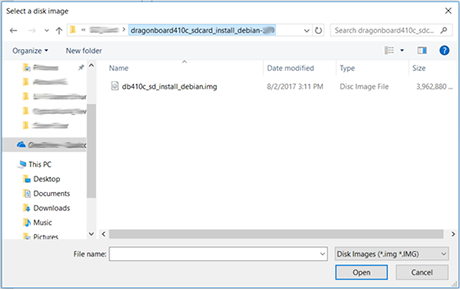
- Under the “Image File” section, click the folder icon in the top right and locate the .img file that you extracted from the zip archive.
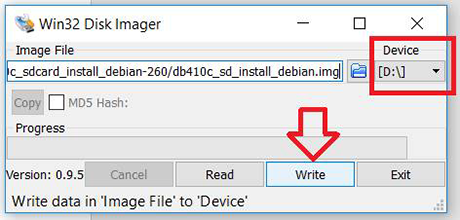
- Under the “Device” section, select the drive corresponding the MicroSD card that you inserted in the previous step.
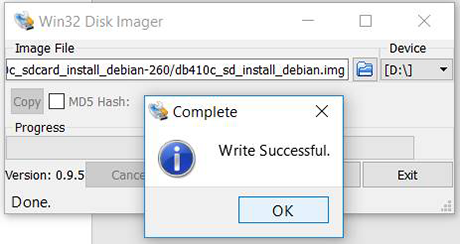
- Click the “write” button to begin the process. If warnings come up about corrupting the device, disregard them and click “Yes” to proceed.
- This process will take anywhere from 20 - 90 minutes to complete, so be patient.
- Upon completion, you should see a pop-up saying, “Write Successful”.

Mac
- Open the Disk Utility application (located in Applications > Utilities) and click on the device that corresponds to the MicroSD Card.
- Click “unmount” in the top navigation bar to unmount the disk, but do not remove it from your computer.
- Open the terminal application and navigate to the directory you extracted from the zip archive. This folder should contain the .img file, which is the Debian Linux image we are going to write to the MicroSD Card.
$ cd
$ ls
 db410c_sd_install_debian.img LICENSE
- Execute the following command in your terminal. This process will take anywhere from 20 - 90 minutes to complete, so be patient!
$ sudo dd if=db410c_sd_install_debian.img of=/dev/bs=4m
$ sudo sync- if=db410c_sd_install_debian.img - this should match the name of the image that was downloaded.
- of=/dev/XXX - this should match the name of the MicroSD Card device name from step 6.
Linux
- Open the terminal application and navigate to the directory you extracted from the zip archive. This folder should contain the .img file, which is the Debian Linux image we are going to write to the MicroSD Card.
$ cd
$ ls
db410c_sd_install_debian.img LICENSE - Execute the following command in your terminal. This process will take anywhere from 20 - 90 minutes to complete, so be patient!
$ sudo dd if=db410c_sd_install_debian.img of=/dev/bs=4M oflag=sync status=noxfer - if=db410c_sd_install_debian.img - this should match the name of the image that was downloaded.
- of=/dev/XXX - this should match the name of the MicroSD Card device name from step 6.
- Remove the MicroSD Card from the host computer
You have successfully created a MicroSD Card that can be used to re-flash the DragonBoard 410c. If you have any trouble with this process, contact the coach on call.
| Attachment | Size |
|---|---|
| 72.91 KB |