Facial Expression Recognition — Part 2: Solution Pipeline on Android
Testing the app on the mobile device
The previous part of this pipeline covered using the TensorFlow low-level API and supported layers from the Qualcomm® Neural Processing SDK for AI to train a facial expression recognition model. Then it covered how to convert the model to the deep learning container (DLC) format using tools in the SDK. The next step is to deploy the DLC on an Android device using APIs in the SDK.
The sample Android application described below was developed and installed on a device powered by Snapdragon® Mobile Platform. It was designed to detect faces captured using Android Camera2 APIs, then to apply a machine learning model for facial expression recognition (FER).
Project prerequisites
- 1. Mobile display
- 2. Snapdragon 835 (or above) Mobile HDK development board
- 3. USB Type C cable
- 4. External camera setup
- 5. Power cable
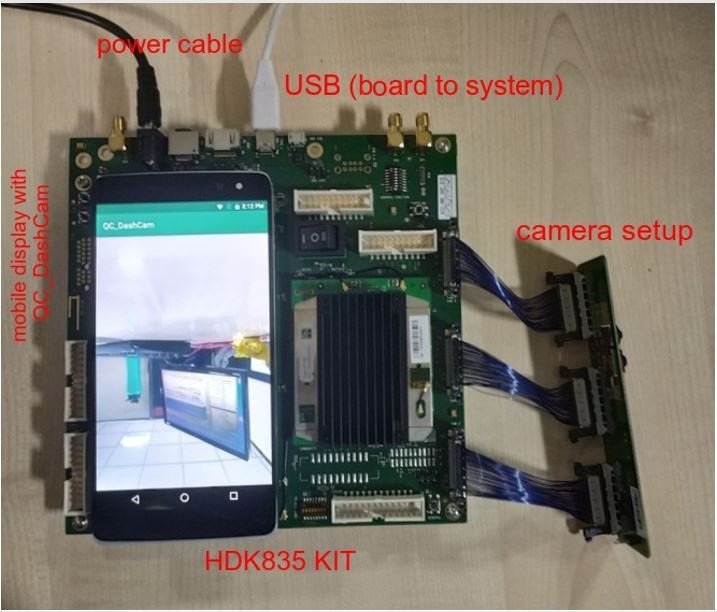
Hardware setup
Set up the hardware as shown in the image:
Software setup
To install the Android application on the development board, switch on the power to the board. Next, connect the board to your development machine with the USB Type C cable. Then, enable USB debugging in the Developer options on the board as follows:
- 1. Open the Settings app through the display.
- 2. Select “About phone” in the list.
- 3. Scroll down and tap “Build number” seven times. (It may be under “Software information.”)
- 4. Press the back arrow and find “Developer options” in the list.
- 5. Open Developer options, and then scroll down to find and enable USB debugging.
The board should now be connected to the development machine.
Application workflow
The application opens a front camera preview, collects all the frames, detects faces present in the frames, crops down to the faces and converts them to bitmaps. The model, in .dlc format, becomes the input for NeuralNetworkBuilder in the Qualcomm Neural Processing SDK. In the inference step, the bitmaps go to the model, which returns a label corresponding to the expression on captured faces.
1. Configuring the neural network
The neural network must be built on the target device to run inference on the model. Following is the code to load a network from the .dlc.
@Overrideprotected NeuralNetwork doInBackground(File... params) { NeuralNetwork network = null; try { final SNPE.NeuralNetworkBuilder builder = new SNPE.NeuralNetworkBuilder(mApplication) .setDebugEnabled(false) // Sets the runtime order to the network .setRuntimeOrder(DSP, GPU, CPU) .setModel(new File("")) .setCpuFallbackEnabled(true) .setUseUserSuppliedBuffers(false); // Build the network network = builder.build(); } catch (IllegalStateException | IOException e) { Logger.e(TAG, e.getMessage(), e); } return network;}2. Using Android Camera2 APIs for face detection
Each CaptureResult is produced by a CameraDevice after processing a CaptureRequest. The following code shows the constant CaptureResult.STATISTICS_FACE_DETECT_MODE, which is the operating mode for face detection and gives the list of detected faces.
private CameraCaptureSession.CaptureCallback mCaptureCallback = new CameraCaptureSession.CaptureCallback() { private void process(CaptureResult result) { Integer mode = result.get(CaptureResult.STATISTICS_FACE_DETECT_MODE ); Face[] faces = result.get(CaptureResult.STATISTICS_FACES);3. Localization of captured faces in custom view
As shown in the following code, the position of a detected face can be obtained through the bounds of the Face class. A rectangle can be drawn on the custom view by left, top, right and bottom parameters of bounds. The Canvas class can be used to draw the rectangle on the face.
final Face face = faces[i];int left = face.getBounds().left;int top = face.getBounds().top;int right = face.getBounds().right;int bottom = face.getBounds().bottom;Rect rect = new Rect((left), (top), (right), (bottom));mOverlayView.setRect(rect, mPreviewSize.getWidth(), mPreviewSize.getHeight());4. Cropping face bounds and scaling the bitmap
A bitmap of fixed height and width can be obtained from TextureView.
Bitmap mBitmap = mTextureView.getBitmap(BITMAP_WIDTH, BITMAP_HEIGHT);if (rect.left > 0 && rect.left < rect.right && rect.top < rect.bottom) { Bitmap cropped = Bitmap.createBitmap(mBitmap, rect.left, rect.top, rect.right - rect.left, rect.bottom – rect.top);//creating bitmap of size 48X48 Bitmap resizedBitmap = Bitmap.createScaledBitmap(cropped, 48, 48, false);}5. Using the model for inference
The resized bitmap is converted to grayscale before handoff as input to the model. Basic image processing depends on the kind of input shape required by the model.
The prediction API requires conversion of the processed image into a tensor. That returns facial expression recognition in the Map <String, FloatTensor> object, as shown below. The size of FloatTensor, which contains the index of facial expression, is 1.
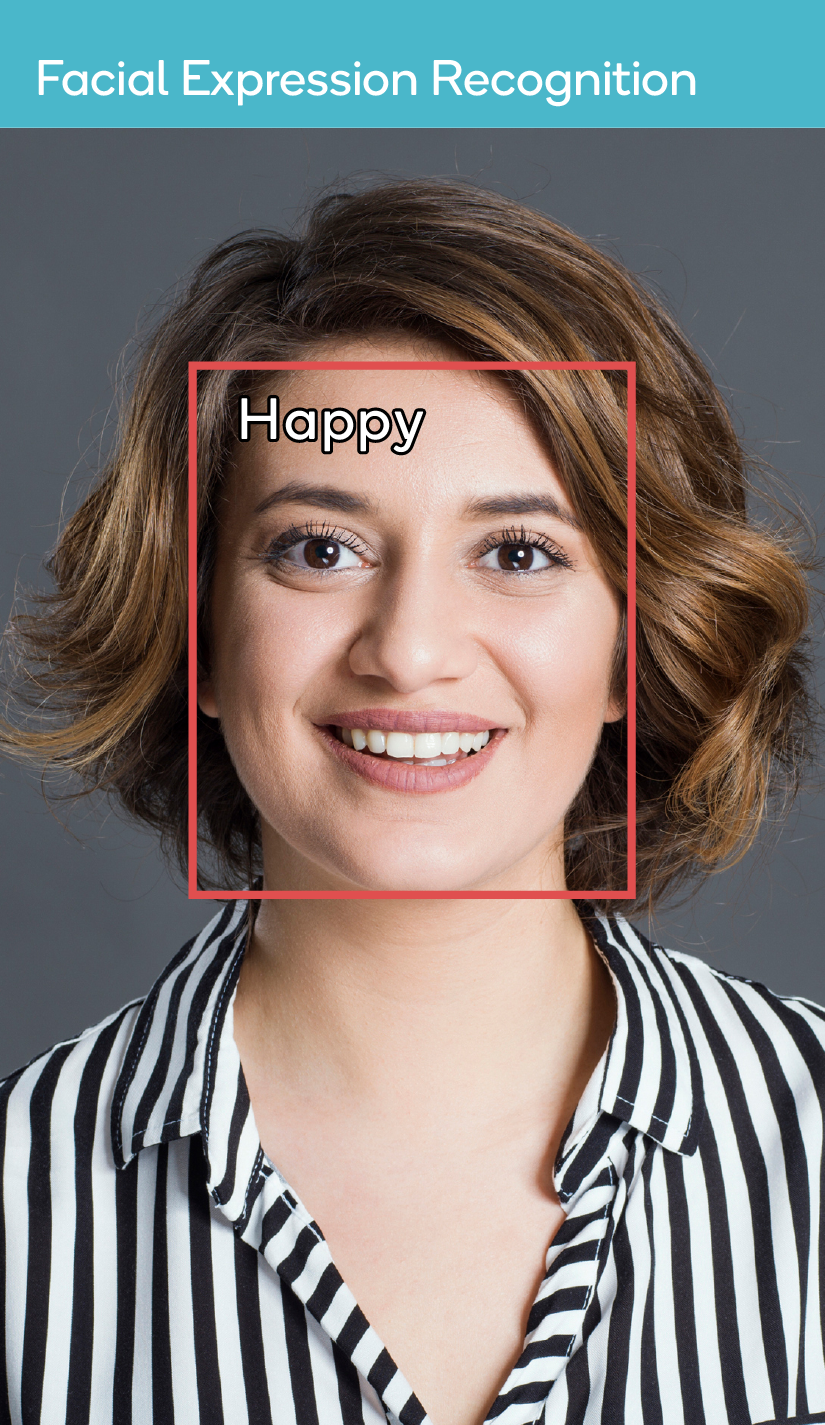
final Map outputs = inferenceOnBitmap(resizedBitmap); for (Map.Entry output : outputs.entrySet()) { final FloatTensor tensor = output.getValue(); final float[] values = new float[tensor.getSize()]; tensor.read(values, 0, values.length); int expID = (int)values[0]; text = lookupMsCoco(expID, "");}//The HashMap of facial expressions versus indexpublic String lookupMsCoco(int cocoIndex, String fallback) { if (mCocoMap == null) { mCocoMap = new ArrayMap<>(); mCocoMap.put(0, "Angry"); mCocoMap.put(1, "Disgust"); mCocoMap.put(2, "Fear"); mCocoMap.put(3, "Happy"); mCocoMap.put(4, "Sad"); mCocoMap.put(5, "Surprise"); mCocoMap.put(6, "Neutral"); } return mCocoMap.containsKey(cocoIndex) ? mCocoMap.get(cocoIndex) : fallback;} Here is a sample screenshot from the application:
Snapdragon and Qualcomm Neural Processing SDK are products of Qualcomm Technologies, Inc. and/or its subsidiaries.